 Ask Chatgpt to summarize WordPress Version Control: A Pro’s Implementation Guide
 Ask Grok to summarize WordPress Version Control: A Pro’s Implementation Guide
 Ask Claude to summarize WordPress Version Control: A Pro’s Implementation Guide
 Ask Perplexity to summarize WordPress Version Control: A Pro’s Implementation Guide
 Ask Gemini to summarize WordPress Version Control: A Pro’s Implementation Guide

A client emails at 9:12 a.m. The homepage is broken, checkout styling is off, and nobody on the team can answer the only question that matters: what changed?
That situation is common in WordPress shops that still treat production like a shared scratchpad. Someone edited a theme file in the dashboard. Someone else updated a plugin over SFTP. A third person changed a setting that lives only in the database. The site still works until it doesn't, and then recovery turns into archaeology.
Professional WordPress version control fixes that, but not with Git alone. A reliable setup has to control code, dependencies, environment config, deployment flow, and the awkward parts WordPress stores outside the filesystem. That's the difference between “we use Git” and “we can ship safely at agency scale.”
Moving Beyond WordPress Content Revisions
WordPress ships with a built-in Revisions system, and it does one job well. It tracks post and page edits so editors can compare changes and restore earlier versions, which is why WordPress version control has historically been strongest for content history rather than technical change management, as noted in Hostinger's explanation of revisions and external tooling.
That's useful for editorial teams. It's not enough for engineers.
If a developer updates a custom block, changes a template part, modifies a plugin setting, or adds integration code, post revisions won't help much. The same goes for configuration drift caused by direct edits in wp-admin or files changed on the server. Those changes live outside the narrow scope of content revision history.
What revisions solve and what they don't
Revisions answer questions like these:
- Editorial rollback: A writer overwrote a landing page and needs the previous draft.
- Change comparison: An editor wants to see what copy changed between saves.
- Per-post recovery: A page update introduced a mistake and needs a quick restore.
They don't answer these:
- Code provenance: Which commit changed the archive template?
- Release safety: What exactly went live in the last deploy?
- Team accountability: Who reviewed the plugin update before merge?
That's why agencies managing multiple builds need a broader operating model than native WordPress history. Teams that handle custom builds, support retainers, or white-label delivery usually end up formalizing process around Git, staging, review, and maintenance controls. If you're scaling delivery across several sites, managing WordPress sites well starts with accepting that WordPress has more than one kind of state.
Practical rule: Use Revisions for editor safety. Use Git for engineering safety.
The real shift
The shift isn't technical first. It's operational. You stop treating the live site as the source of truth and start treating the repository as the source of truth for code.
Once that happens, every other decision gets cleaner. Developers work locally. Pull requests become the approval gate. Staging becomes mandatory. Rollbacks stop being improvisation.
That's the foundation of WordPress version control that holds up under client pressure.
Structuring Your WordPress Git Repository
The repo is where most WordPress teams either get disciplined or get buried. The common failure mode is simple. They commit too much, or they commit the wrong things.
The question isn't whether Git can track WordPress. It can. The better question is what belongs in the repository in a real production workflow. That's where many teams struggle, and it's also why experienced developers often avoid versioning WordPress core directly and prefer dependency management with Composer, as discussed in Webnus's guide to practical WordPress version control boundaries.
What to commit
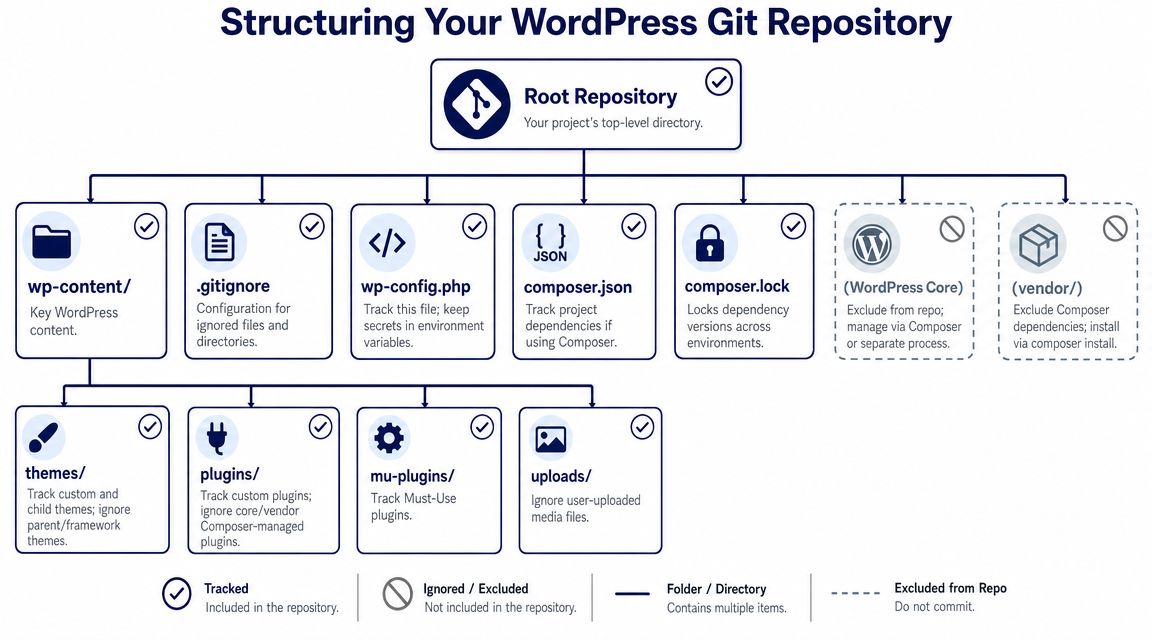
In a professional WordPress version control setup, the repository usually tracks the parts your team owns and maintains:
- Custom themes: Your child theme, block theme, or bespoke theme code.
- Custom plugins: Feature plugins, integration plugins, utilities, and business logic.
- MU plugins: Anything that must load consistently across environments.
- Composer files:
composer.jsonandcomposer.lock. - Build and tooling config: Linting rules, package manifests, deployment scripts, CI config.
- Config scaffolding: A
wp-config.phpstrategy that reads secrets from the environment instead of hardcoding them.
What to ignore
A clean repo also excludes a lot:
- WordPress core: Manage it as a dependency or as a platform concern.
- Uploads: User-generated media doesn't belong in normal Git history.
- Vendor directories: Rebuild them during install or deploy when your workflow supports it.
- Machine-local files: OS junk, IDE settings, cache directories.
- Secrets: Anything containing credentials, salts, or API keys.
A practical .gitignore often looks like this:
/wp-admin/
/wp-includes/
/wp-content/uploads/
/wp-content/cache/
/wp-content/upgrade/
/vendor/
/node_modules/
.env
.env.*
.DS_Store
Thumbs.db
*.log
The exact file changes based on Bedrock, a standard WordPress install, or a custom deployment pattern. The principle doesn't. Keep the repo focused on owned code and reproducible configuration.
Why Composer changes everything
Composer is the line between hobbyist WordPress version control and production-grade dependency management.
Instead of dragging plugin ZIPs into the repo or updating production by hand, define dependencies in composer.json. That gives your team a repeatable install process and a clear record of version changes. It also stops the “works on my machine” problem that appears when each developer runs slightly different plugin or core versions.
A minimal example:
{
  "name": "agency/client-site",
  "require": {
    "johnpbloch/wordpress": "*",
    "wpackagist-plugin/wordpress-seo": "*",
    "wpackagist-plugin/advanced-custom-fields": "*"
  }
}
I'm opinionated here. Don't commit WordPress core unless you have a very specific platform reason. Treat core and most third-party plugins as dependencies, not authored application code. Save the repository for the code your team is responsible for maintaining.
That also makes collaboration on custom WordPress theme development much cleaner. Theme code stays reviewable. Plugin logic stays isolated. Dependency changes become explicit instead of sneaking in through wp-admin.
A bloated WordPress repo usually signals a team that hasn't decided what the product actually is.
For most agency builds, the product is custom code plus controlled dependencies. Structure the repository like that, and everything downstream gets easier.
Implementing a Professional Git Workflow
A tidy repository won't save a team with a sloppy workflow. Protection stems from how changes move from a developer's machine to production.
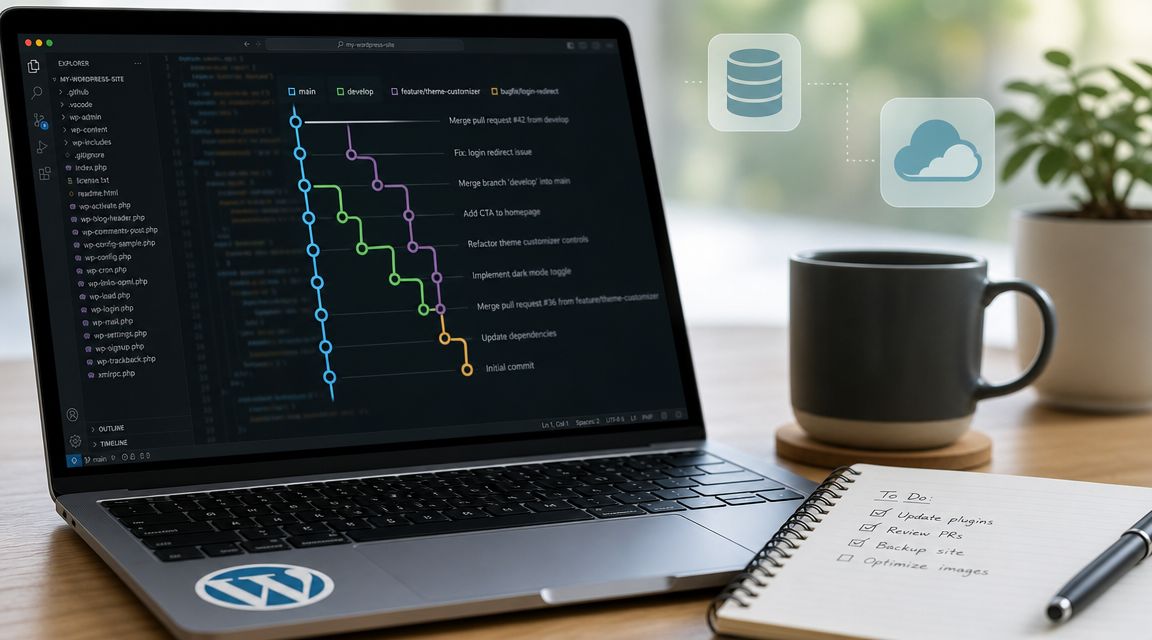
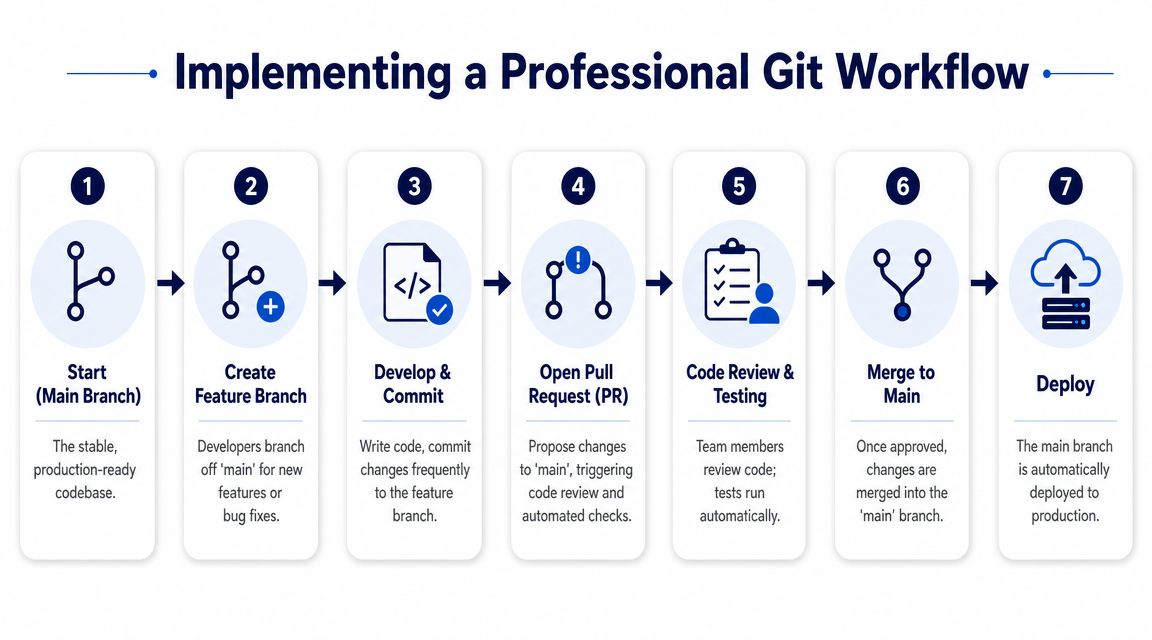
The strongest team pattern for WordPress is still simple: short-lived feature branches, pull requests, code review, and staging validation before production merge. Pressable explicitly recommends frequent small commits, descriptive branch names, and review for every change in a GitHub-style WordPress workflow in its guidance on GitHub workflows for WordPress teams.
A branching model that works
You don't need an elaborate branching philosophy. You need a model people will follow.
For most WordPress agency projects, this pattern is dependable:
mainormaster: Production-ready code only.develop: Integration branch for approved work before release.- Feature branches: One branch per bug fix, feature, or refactor.
- Hotfix branches: Emergency production repairs with tight scope.
This is close to GitHub Flow with a develop buffer. It's practical for teams shipping client work where multiple features are moving at once.
A real example
Say a developer needs to add a custom Gutenberg block for testimonial cards.
Start from the integration branch:
git checkout develop
git pull origin develop
git checkout -b feature/testimonial-card-block
Do the work locally. That could include:
- registering the block
- building block editor assets
- adding render logic
- styling frontend output
- testing block behavior in a local environment
Then commit in small units:
git add .
git commit -m "Add testimonial card block registration"
git add .
git commit -m "Style testimonial card block frontend output"
git add .
git commit -m "Add editor controls for testimonial layout options"
Push the branch:
git push origin feature/testimonial-card-block
Open a pull request into develop.
That pull request should carry enough information for another engineer to review it without guessing. Include the purpose, scope, testing notes, screenshots if UI changed, and any deployment considerations.
What a pull request should enforce
A PR is not paperwork. It's the quality gate.
A good WordPress PR usually checks for:
- Code review: Another developer checks logic, standards, and side effects.
- Build success: Frontend assets compile cleanly.
- Static checks: PHPCS, ESLint, or project-specific linting passes.
- Functional review: The feature works in staging and doesn't break adjacent templates.
- Deployment notes: Any database-sensitive or manual follow-up gets documented.
If you skip review because “it's just a small CSS tweak,” that exception eventually becomes your process.
The teams that break production most often aren't the ones making complex changes. They're the ones normalizing unreviewed small changes.
Why short-lived branches matter
Long-lived branches rot fast in WordPress projects. Themes move. plugin versions shift. block markup changes. Another developer updates shared components, and your branch drifts into conflict.
Short-lived branches reduce that pain. They also make review easier because the change set stays readable. A branch with a few targeted commits gets approved faster and rolled back faster than a branch containing a week of mixed work.
Staging is the last gate before merge to production-ready code. If your team doesn't have one, fix that first. A proper staging site gives reviewers a safe place to validate editor behavior, plugin interactions, checkout flows, and content rendering before clients see anything.
What doesn't work
A few habits consistently create trouble:
Committing directly to main
It removes review, removes isolation, and turns deployment into a gamble.Uploading files through SFTP
Those edits bypass Git history and create immediate drift.Bundling unrelated work
A bugfix PR should not also contain a plugin update, CSS cleanup, and config tweak.Letting PRs sit too long
The longer a branch stays open, the harder it gets to merge cleanly.
WordPress version control is less about memorizing Git commands and more about enforcing a release discipline. The branch model is just the visible part of that discipline.
Solving the Database and Media Sync Problem
At this point, WordPress version control stops being neat.
Git handles code well because code is file-based and predictable. WordPress stores a big part of site reality elsewhere. Posts, options, users, orders, form entries, and plugin settings live in the database. Media lives in uploads. Both change constantly, often on the live site.
That's why the professional rule is so important: keep code state separate from content state. WP Engine's workflow guidance is explicit here. Teams should make filesystem changes locally, commit code to Git, copy databases down to development when needed, and avoid pushing databases up with Git because that risks overwriting live posts, orders, and user data in production, as detailed in WP Engine's development workflow best practices.
The non-negotiable rule
Never treat the production database as something you “deploy over” from a developer machine.
If your site runs WooCommerce, memberships, bookings, editorial publishing, or user accounts, pushing a local database upward can erase live activity. That's not a technical inconvenience. It's business damage.
Database and Media Sync Strategies Comparison
| Strategy | Primary Use Case | Pros | Cons |
|---|---|---|---|
| Database pull to local or staging | Developers need fresh content, settings, and structure for testing | Matches real content conditions, supports realistic QA, aligns with safe pull-down workflow | Requires care around sanitized data, search-replace, and local environment parity |
| Serialized database migration tools | Teams moving specific database changes between environments in a controlled way | Better handling of WordPress data structures, useful for targeted migration tasks | Still risky if used casually against production, can move unwanted settings along with intended changes |
| Git LFS for media | Small teams that want some media tracking alongside repository workflow | Keeps binary files out of normal Git history, can help with a narrow asset set | Adds workflow overhead, still awkward for active editorial media libraries |
| Cloud media offloading | Sites with growing media libraries, multiple environments, or distributed teams | Reduces repo bloat, keeps media storage centralized, easier environment consistency | Adds infrastructure dependency and setup complexity |
What usually works in practice
For agencies and in-house teams, the most durable pattern looks like this:
- Code goes through Git
- Database gets pulled down as needed
- Media is handled outside normal Git
- Production content remains authoritative
That means a developer can pull the latest production database into local or staging for accurate testing, but they don't push that database back up as part of release. Releases move code forward. Content continues to live where users and editors create it.
Choosing a media strategy
There isn't one right answer for uploads. There is a wrong instinct, though. Don't dump an active uploads directory into a normal Git repo and assume that scales.
A better decision comes from project type:
- Marketing site with light media use: A straightforward synced uploads workflow may be enough.
- Editorial platform with frequent uploads: Centralized storage or platform-level media syncing is usually saner.
- Enterprise multisite or WooCommerce: Offloaded media is usually easier to reason about over time than binary versioning.
Git LFS can be acceptable for narrow asset needs, especially if the media is part of a code release rather than user-generated content. For a normal WordPress media library, it tends to add friction without solving the core state problem.
Keep the repo for assets your team builds. Keep user-generated media out of the repo unless you have a very specific reason not to.
The practical migration mindset
If you're replatforming or cleaning up a legacy install, don't try to “version control everything” in one move. Stabilize the workflow first. Separate owned code, live data, and media handling. Then add migration tooling where needed.
That approach is also useful during larger hosting moves or rebuilds, especially if you're planning to migrate a WordPress website to a new host without carrying forward years of unmanaged drift.
The hardest part of WordPress version control isn't Git. It's respecting what Git should not own.
Managing Environments and Secret Keys
A repository should be portable. Secrets should not.
If wp-config.php contains production credentials, API keys, salts, and service tokens that are committed to Git, your workflow is fragile before anyone writes a line of feature code. You want the codebase to move cleanly between development, staging, and production while each environment supplies its own sensitive values.
What environment separation looks like
The baseline pattern is:
- Tracked code: Shared across every environment
- Untracked secrets: Different in each environment
- Environment-aware config:
wp-config.phpreads values instead of hardcoding them
A .env file is a practical way to do that in local and managed deployments. The file stays out of version control, while your code reads from environment variables.
Example .env for local development:
DB_NAME=wordpress_local
DB_USER=local_user
DB_PASSWORD=local_password
DB_HOST=localhost

WP_ENV=development
WP_HOME=http://wordpress.local
WP_SITEURL=http://wordpress.local/wp

AUTH_KEY=replace-me
SECURE_AUTH_KEY=replace-me
LOGGED_IN_KEY=replace-me
NONCE_KEY=replace-me
AUTH_SALT=replace-me
SECURE_AUTH_SALT=replace-me
LOGGED_IN_SALT=replace-me
NONCE_SALT=replace-me
A one-time wp-config.php cleanup
With phpdotenv, your wp-config.php can load those values without storing the secrets in the repo.
A simplified pattern:
<?php

require_once __DIR__ . '/vendor/autoload.php';

$dotenv = DotenvDotenv::createImmutable(__DIR__);
$dotenv->load();

define('DB_NAME', $_ENV['DB_NAME']);
define('DB_USER', $_ENV['DB_USER']);
define('DB_PASSWORD', $_ENV['DB_PASSWORD']);
define('DB_HOST', $_ENV['DB_HOST']);

define('WP_HOME', $_ENV['WP_HOME']);
define('WP_SITEURL', $_ENV['WP_SITEURL']);

define('AUTH_KEY', $_ENV['AUTH_KEY']);
define('SECURE_AUTH_KEY', $_ENV['SECURE_AUTH_KEY']);
define('LOGGED_IN_KEY', $_ENV['LOGGED_IN_KEY']);
define('NONCE_KEY', $_ENV['NONCE_KEY']);
define('AUTH_SALT', $_ENV['AUTH_SALT']);
define('SECURE_AUTH_SALT', $_ENV['SECURE_AUTH_SALT']);
define('LOGGED_IN_SALT', $_ENV['LOGGED_IN_SALT']);
define('NONCE_SALT', $_ENV['NONCE_SALT']);

if ($_ENV['WP_ENV'] === 'development') {
    define('WP_DEBUG', true);
    define('SCRIPT_DEBUG', true);
}
Then add .env to .gitignore.
The onboarding payoff
This setup improves two things immediately.
First, security gets cleaner because secrets aren't passing around in commits, pull requests, and exported ZIP files. Second, onboarding gets easier because a developer can clone the repo, create a local .env, install dependencies, and start work without touching production credentials.
A good environment model also makes staging more honest. The code should be the same shape everywhere. What changes is the configuration and the connected services.
One more WordPress-specific habit
Use environment-based flags for behavior that shouldn't be identical everywhere. Debug settings, cache toggles, indexing rules, and integration endpoints often need environment-aware handling. Keep those decisions in config, not scattered through theme files or admin settings where nobody will remember them later.
That's the difference between a deployable system and a pile of assumptions.
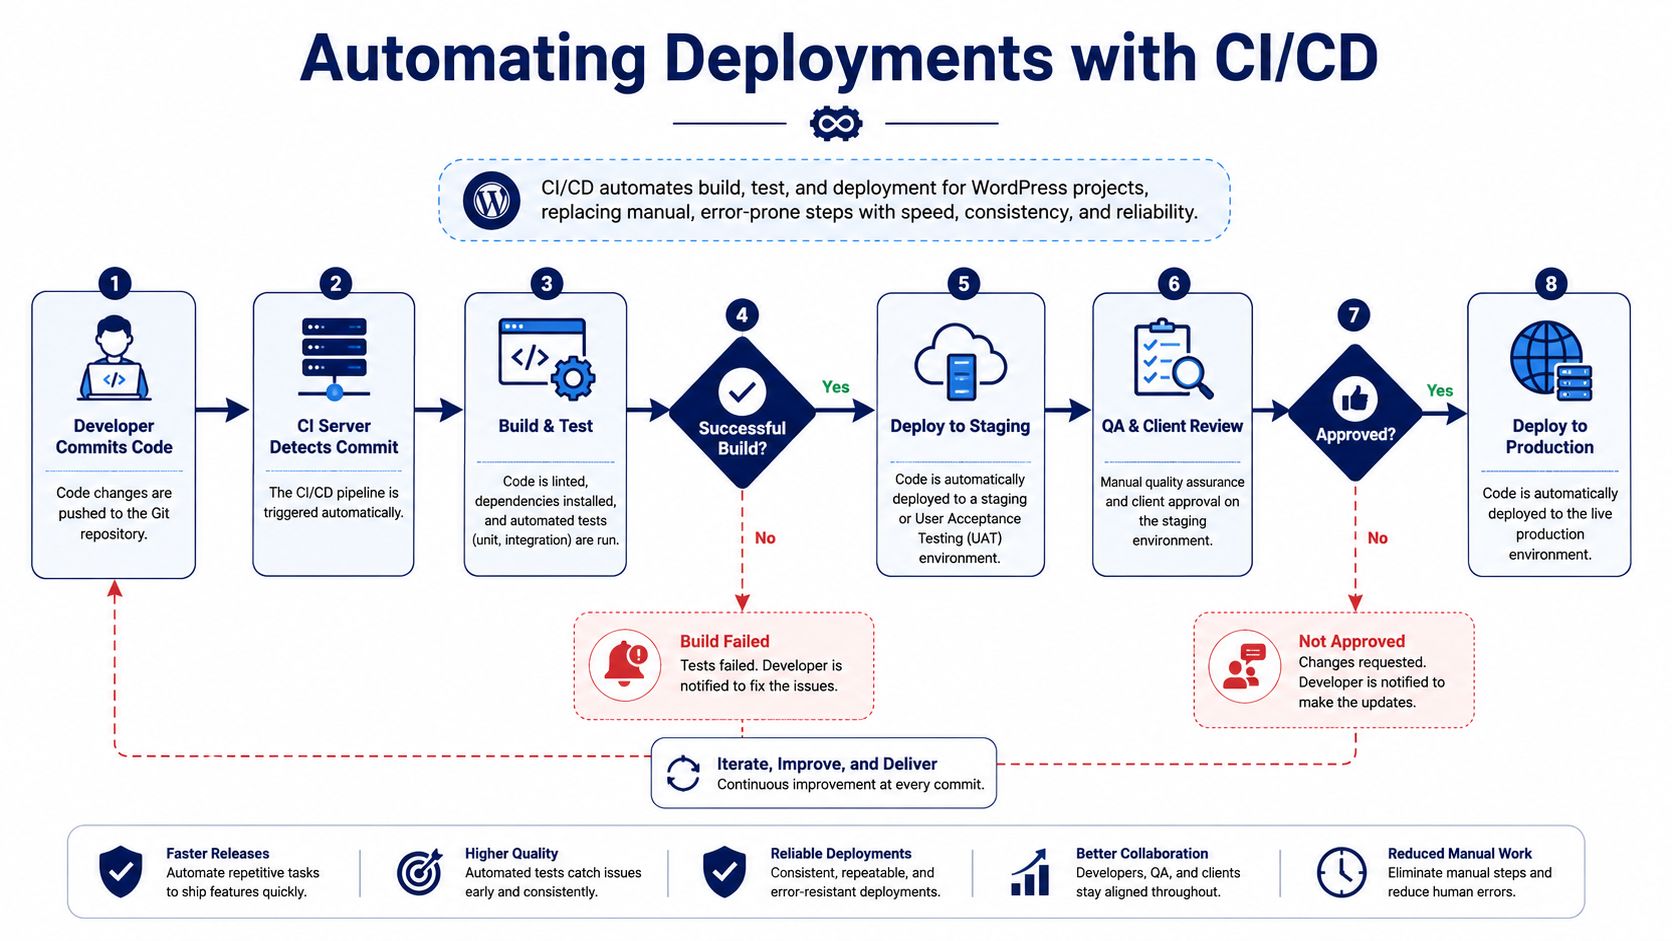
Automating Deployments with CI/CD
Manual WordPress deployment is where disciplined teams suddenly get careless. They review the code, approve the PR, and then someone uploads files by hand because “it's quicker.”
It isn't quicker once you account for missed files, wrong directories, skipped build steps, and silent inconsistencies between staging and production. At WordPress scale, that kind of sloppiness matters. Pantheon notes that WordPress powered 43.5% of all websites worldwide and that there were 1.19 billion websites online as of March 2025 in its WordPress statistics overview. Even small improvements in release management and staging validation affect a massive operational footprint.
Automation is how you make release quality repeatable.
What the pipeline should do
For most WordPress projects, a CI/CD pipeline should handle a predictable sequence:
- A developer merges approved code.
- The pipeline installs Composer dependencies.
- Frontend assets build.
- Linting and tests run.
- The deploy artifact is prepared.
- Code moves to staging or production through a scripted process.
That flow removes improvisation. It also creates one place to enforce quality checks.
A simplified GitHub Actions example:
name: Deploy WordPress

on:
  push:
    branches:
      - main

jobs:
  build-and-deploy:
    runs-on: ubuntu-latest

    steps:
      - name: Checkout repository
        uses: actions/checkout@v4

      - name: Setup PHP
        uses: shivammathur/setup-php@v2
        with:
          php-version: '8.2'

      - name: Install Composer dependencies
        run: composer install --no-dev --optimize-autoloader

      - name: Setup Node
        uses: actions/setup-node@v4
        with:
          node-version: '20'

      - name: Install frontend dependencies
        run: npm ci

      - name: Build assets
        run: npm run build

      - name: Run code checks
        run: |
          composer lint
          npm run lint

      - name: Deploy
        run: ./deploy.sh
Where teams usually overcomplicate it
You don't need to automate every possible action on day one. Start with the path that removes the most human error:
- build dependencies consistently
- run checks consistently
- deploy code consistently
That alone is a major upgrade over SFTP and checklist deployments.
Later, you can add extras like smoke tests, Slack notifications, release tagging, or environment-specific workflows. If your agency is building products with more complex moving parts, such as APIs, automation, or payment flows, it helps to study adjacent architectures too. For example, teams experimenting with monetizing AI agents with crypto payments run into the same core problem: repeatable deployment, controlled configuration, and clear handoffs between code and live state.
Before the next layer, it helps to see the mechanics in action:
What belongs in deploy automation and what doesn't
A CI/CD pipeline should deploy code and build artifacts. It shouldn't casually mutate production content.
That means:
- Yes to theme code, plugin code, compiled assets, and deployment scripts
- No to overwriting live orders, editor-created content, or environment secrets
This is also the point where process-oriented service partners can help. Some teams use platform-native pipelines. Others use GitHub Actions with custom scripts. Others work with agencies that already operate around branching, pull requests, review, and auditable releases. The right answer depends on whether you need tooling support, delivery support, or both.
Automation doesn't remove responsibility. It removes inconsistency.
Once deployment is scripted, every release follows the same path. That's what lowers stress. Not speed by itself, but predictability.
Executing Safe Releases and Rollbacks
A mature WordPress version control workflow proves its value on a bad day, not a good one.
Safe releases start with tagging. When you create versioned milestones like v1.4.0 or v1.4.1, you mark known states in the project history. That gives your team a clean reference for deployments, changelogs, and support work.
Typical release commands are straightforward:
git checkout main
git pull origin main
git tag v1.4.1
git push origin v1.4.1
When a release introduces a bug, rollback should also be disciplined. If the issue came from a merged change, revert the merge commit, push the fix, and redeploy.
git revert <commit-hash>
git push origin main
That works because everything earlier in the workflow was controlled. Code came through branches. Review happened in pull requests. Deployments were automated. Secrets stayed out of the repo. Live data was not bundled into code release logic.
Clients usually don't care which Git command you ran. They care that an incident stayed small, recovery was fast, and nobody made things worse while trying to help. That's the business case for doing WordPress version control properly.
If your agency or in-house team needs senior help setting up a clean Git workflow, Composer-based dependency management, staging discipline, or auditable WordPress deployments, IMADO can support the engineering side without forcing your team into a brittle process.
Let’s build something exceptional
Tell us about your project – we’ll help you launch a fast, scalable, SEO-optimized WordPress platform built for growth.